Blog
Seedling Problems? Spotting & Fixing VPD, Salt, and Fertilizer Issues Early
Starting seeds successfully requires more than just good genetics and proper lighting. Even experienced growers encounter mysterious seedling problems that can derail an entire crop if not caught early. Three of the most common culprits behind struggling seedlings are VPD (Vapor Pressure Deficit) imbalances, salt buildup, and fertilizer-related issues.
The key to solving these problems lies in reading the visual cues your plants are giving you. Seedlings communicate stress through specific leaf patterns, growth rates, and soil conditions that trained eyes can spot before permanent damage occurs.
Understanding VPD and Its Impact on Seedlings
VPD represents the difference between how much moisture the air can hold versus how much it actually contains. For seedlings, this measurement directly affects their ability to transpire properly and uptake nutrients through their roots.
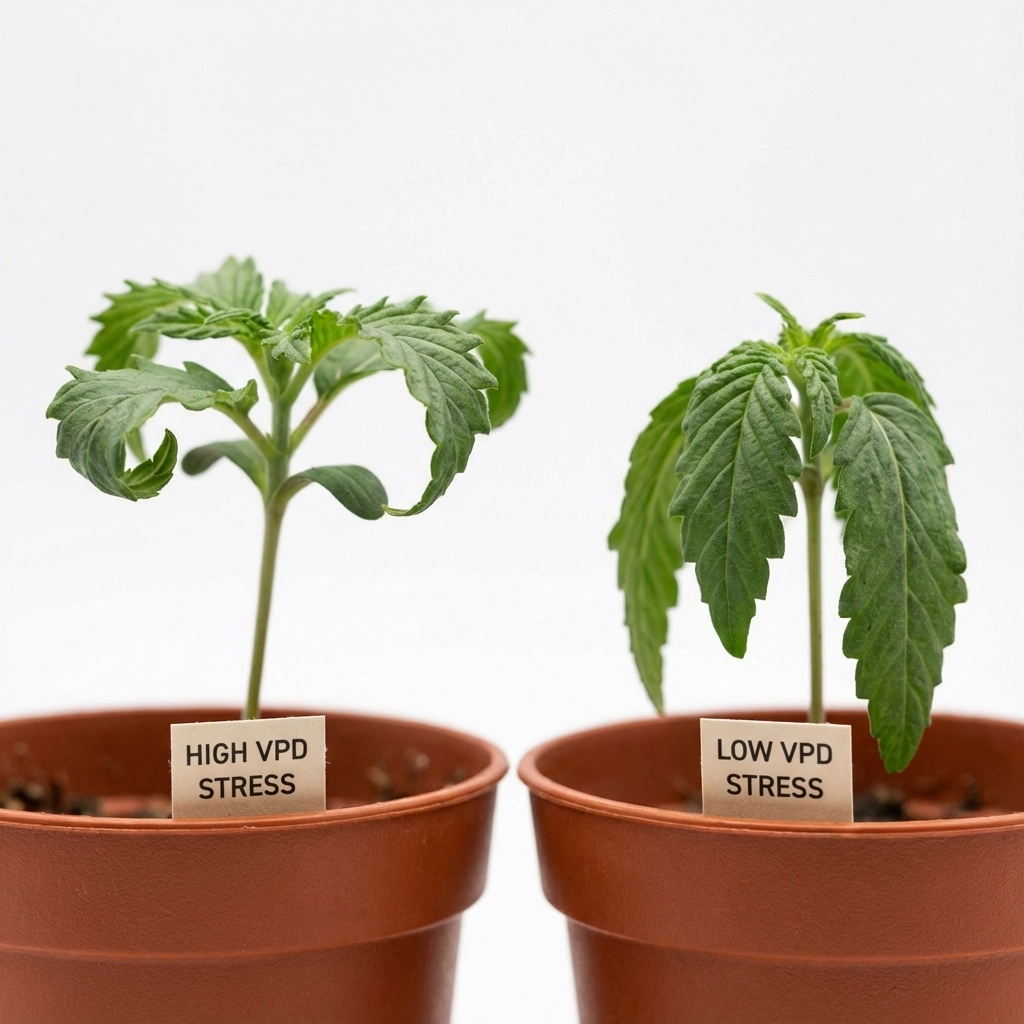
Optimal VPD for seedlings ranges from 0.4 to 0.8 kPa. When VPD is too high (low humidity), seedlings struggle to maintain proper water balance. When it's too low (high humidity), they become susceptible to fungal issues and slow nutrient transport.
Visual Signs of VPD Problems
High VPD (Low Humidity) Symptoms:
- Leaf edges curling upward or downward
- Rapid soil drying despite adequate watering
- Stunted growth with thick, waxy-looking leaves
- Seedlings appearing "stressed" even with proper nutrients
Low VPD (High Humidity) Symptoms:
- Soft, droopy leaves that feel overly moist
- Slow growth despite good conditions
- Dark spots or fuzzy growth on soil surface
- Seedlings stretching excessively toward light
Quick VPD Fixes
For High VPD Issues:
- Increase humidity by placing water trays near seedlings
- Use humidity domes or covers during early stages
- Mist the air around (not directly on) seedlings
- Reduce air circulation temporarily
For Low VPD Issues:
- Improve air circulation with gentle fans
- Remove humidity domes earlier than planned
- Reduce watering frequency
- Ensure proper drainage in seed trays
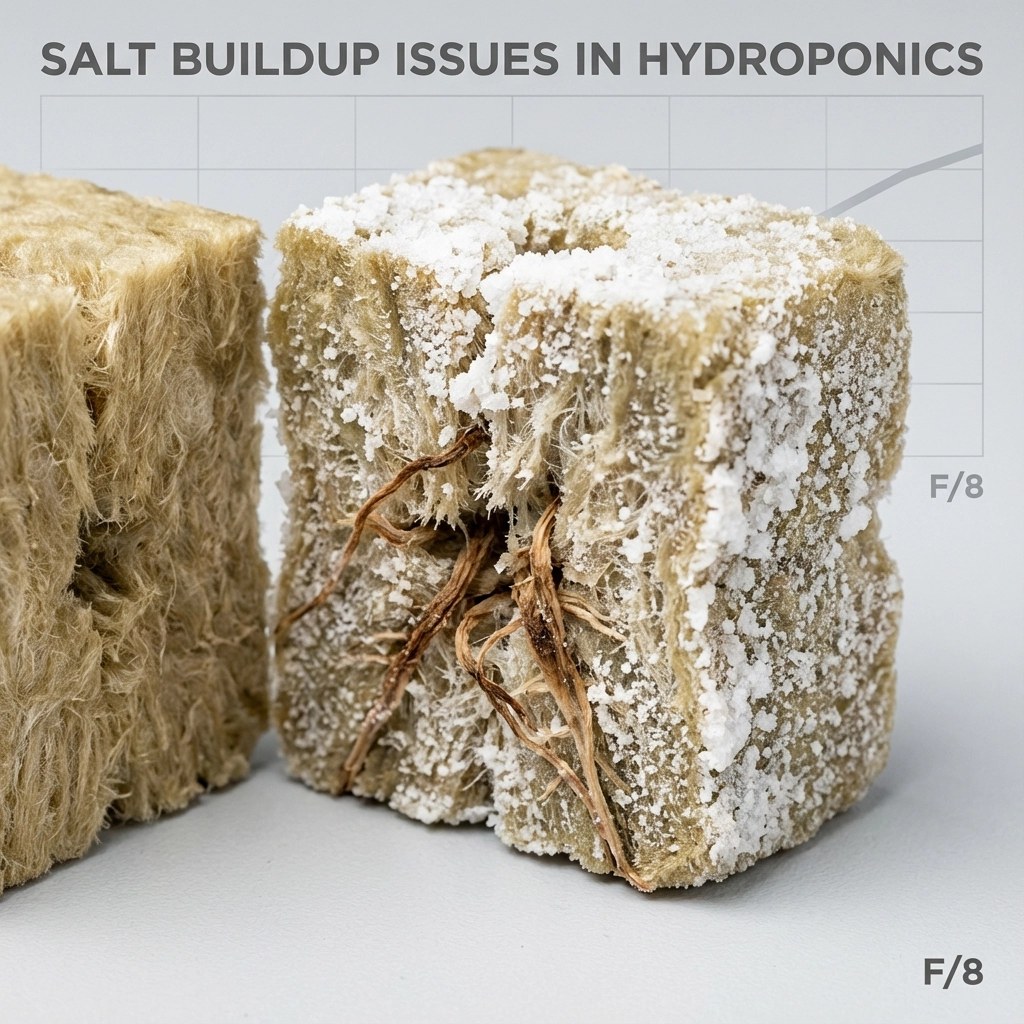
Identifying Salt Buildup in Seedling Systems
Salt accumulation happens when fertilizers concentrate in growing media faster than plants can absorb them. This creates a hostile environment where roots actually lose water to the surrounding soil: the opposite of what you want.
Visual Cues of Salt Problems
On Plant Tissue:
- Leaf margins turning brown or yellow ("burning")
- New growth appearing stunted or twisted
- Roots that look brown or feel slimy
- Overall plant appears dehydrated despite moist soil
In Growing Media:
- White, crusty residue on soil surface
- Media that feels "salty" or gritty
- pH readings that drift consistently higher
- EC/TDS readings above 1.2 in runoff water
Salt Buildup Solutions
Immediate Actions:
- Flush the system with pH-balanced water (6.0-6.5)
- Reduce fertilizer concentration by 50% temporarily
- Increase drainage to prevent standing water
- Test runoff water to monitor salt levels dropping
Prevention Strategies:
- Use quality water with low starting TDS
- Feed little and often rather than heavy, infrequent doses
- Maintain proper wet/dry cycles
- Choose fertilizers designed for seedling-stage plants
Fertilizer Problems: Too Much, Too Little, Wrong Timing
Seedlings have dramatically different nutritional needs compared to mature plants. Their root systems are tiny, their metabolisms are just getting started, and they're extremely sensitive to nutrient imbalances.
Common Fertilizer Mistakes
Overfeeding Symptoms:
- Dark green leaves that appear "burned"
- Rapid initial growth followed by sudden stalling
- Salt buildup (as described above)
- Increased susceptibility to pests and diseases
Underfeeding Symptoms:
- Pale, yellowing leaves starting from bottom up
- Slow, weak growth despite good environmental conditions
- Purple or reddish leaf coloration
- Roots that appear white but sparse
Reading Soil and Media Cues
Your growing medium tells a story about what's happening below the surface. Here's what to look for:
Healthy Media Indicators:
- Consistent moisture throughout (not bone dry or soggy)
- No visible salt crystals or white residue
- Fresh, earthy smell (not sour or ammonia-like)
- Media that springs back when gently squeezed
Problem Media Signs:
- Crusty, hard surface that water runs off
- Green or white fungal growth
- Strong chemical or ammonia odors
- Media that stays soggy or dries out instantly
Creating an Early Detection System
The most successful growers develop routines for catching problems before they become disasters. Here's a practical approach:
Daily Visual Checks (30 seconds per tray)
- Overall plant color and posture
- Soil surface condition
- Any new spots or discoloration on leaves
- Growth rate compared to previous day
Weekly Detailed Inspections (5 minutes per tray)
- Lift plants to check root development
- Test runoff water pH and EC
- Document growth measurements
- Adjust environmental controls based on observations
Environmental Controls for Problem Prevention
Most seedling issues stem from environmental imbalances rather than genetics or bad luck. Here's how to maintain optimal conditions:
Temperature Management
- Soil temperature: 70-75°F for most seeds
- Air temperature: 2-3°F cooler than soil
- Avoid temperature swings greater than 10°F in 24 hours
Humidity Control
- Week 1-2: 70-80% relative humidity
- Week 3-4: 60-70% relative humidity
- Week 5+: 50-60% relative humidity
Air Movement
- Gentle circulation that moves leaves slightly
- No direct drafts on young seedlings
- Fresh air exchange to prevent CO2 depletion
Troubleshooting Quick Reference Guide
When you spot a problem, use this systematic approach:
Step 1: Assess the Environment
- Check temperature, humidity, and air movement
- Verify lighting intensity and duration
- Look for obvious stressors (pests, diseases)
Step 2: Examine the Media
- Test pH and EC of both input and runoff water
- Check drainage and moisture retention
- Look for salt buildup or fungal issues
Step 3: Evaluate Nutrition
- Review feeding schedule and concentrations
- Consider plant age and nutritional requirements
- Adjust based on visual symptoms
Step 4: Take Corrective Action
- Start with the most obvious problem
- Make one change at a time
- Monitor for 3-5 days before making additional adjustments
Building Long-Term Success
Preventing seedling problems is always easier than fixing them. Focus on creating stable, consistent conditions rather than chasing perfect numbers. Your plants will reward consistency over perfection every time.
Key Success Factors:
- Maintain detailed growing logs to identify patterns
- Invest in quality monitoring equipment (pH/EC meters, hygrometers)
- Source seeds and supplies from reputable vendors
- Join grower communities to learn from others' experiences
Remember that every growing environment is unique. What works perfectly in one setup may need adjustment in another. The skill lies in reading your specific plants and conditions, then making informed adjustments based on what you observe.
By developing these diagnostic skills early, you'll save countless hours and avoid the frustration of losing promising seedlings to preventable problems. Your plants are constantly communicating their needs: learning to listen is one of the most valuable skills any grower can develop.