Blog
The Perfect Indoor Gardening Setup: Budget vs. Premium
So, you’ve decided to move the garden inside. Maybe the outdoor season is too short, or maybe you’re just tired of battling pests and unpredictable weather. Whatever the reason, you’re now facing the ultimate grower’s dilemma: do you go the "budget" route and hope for the best, or do you drop the cash on a "premium" setup?
The fact of the matter is, both paths can lead to a successful harvest. However, the road to get there looks very different depending on your gear. At Perfect Gardens, we see growers at every stage of their journey. Some start with a shop light and a prayer, while others go straight for the top-of-the-line Kind LED grow lights.
In this guide, we’re going to break down the differences between budget and premium setups. We’ll look at where you can afford to cut corners and where skimping will almost certainly come back to haunt you.
The Foundation: Grow Tents
Think of your grow tent as the "house" for your plants. A budget tent and a premium tent might look similar in a grainy online photo, but the difference in build quality is massive once you get them in the room.
Budget Tents
Budget tents usually feature thinner canvas (often 600D or lower) and plastic corners on the frame. While they "work," they are notorious for light leaks. If you can see light coming out of the seams, light is also getting in during the dark cycle, which can stress your plants and lead to hermaphroditism or stunted growth. The zippers on budget tents also tend to be the first thing to fail.
Premium Tents
When you step up to a premium option, like the AC Infinity Grow Tent AC-CBA866, you’re getting 2000D canvas. This is significantly thicker, meaning it’s more durable, better at containing noise, and virtually light-proof. Premium tents also use all-steel frames that can support much more weight: crucial if you plan on hanging heavy carbon filters and high-end lighting fixtures.

The Verdict: If you are on a strict budget, a cheaper tent is okay to start, but be prepared to use duct tape to seal light leaks. If you want a "buy it once" solution, go premium.
Lighting: The Heart of the Garden
If the tent is the house, the light is the sun. This is the single most important piece of equipment in your setup.
Budget Lighting
Budget LED lights are everywhere. They often use older diode technology and lack a full spectrum. They might claim to pull "1000 watts," but in reality, they pull 100 watts from the wall. They run hot, they aren't very efficient, and the light distribution is usually poor, meaning your plants in the corners will struggle while the one in the middle gets "light burned."
Premium Lighting
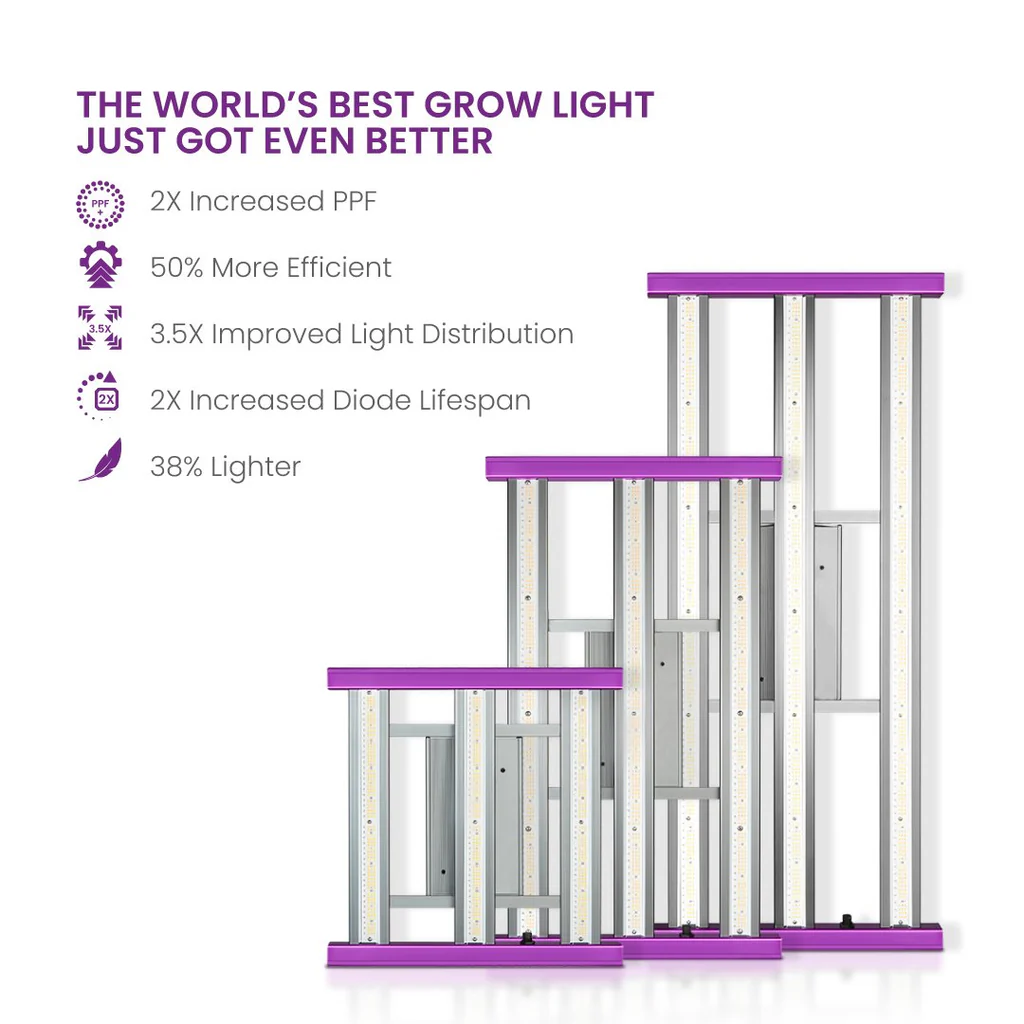
This is where the investment pays off the most. Premium lights, such as the Kind LED X330 or the Kind LED X420, offer up to 2X increased PPF (Photosynthetic Photon Flux) and 50% higher efficiency.
What does that actually mean for you? It means more light gets to the plant for every dollar you spend on your electric bill. These lights are designed to mimic the natural spectrum of the sun, leading to denser flowers, higher terpene profiles, and overall healthier plants.
The Verdict: Never skimp on lighting. If you have $1,000 to spend, spend $600 of it on the light. It is the primary factor in your final yield and quality.
Ventilation: The Lungs of the Operation
Plants need to breathe. In a closed grow tent, heat and humidity build up quickly. Without proper ventilation, you are basically creating a sauna for mold and powdery mildew.
Budget Ventilation
A budget setup usually involves a cheap "inline" duct fan and a basic clip-on fan. These fans are often loud, vibrate heavily, and have no way to adjust the speed. They might move air, but they aren't smart.
Premium Ventilation
Premium systems, like those featuring the AC Infinity Cloudline series, come with smart controllers. These controllers automatically adjust the fan speed based on the temperature and humidity levels you set.
You also need to consider odor control. A premium carbon filter uses high-grade activated charcoal to ensure that the air leaving your tent doesn't smell like a commercial farm. Cheaper filters often "clog" or stop working halfway through a flowering cycle, which can be a disaster if you have neighbors close by.

The Verdict: If you live in an apartment or have close neighbors, premium ventilation and odor control are non-negotiable. If you're in a detached garage, you can get away with a simpler setup for a while.
Watering and Nutrients: Manual vs. Automated
How much time do you want to spend in your garden? For some, the daily ritual of hand-watering is therapeutic. For others, it’s a chore that leads to "vacation anxiety."
The Budget Approach (Manual)
Budget setups rely on manual watering and basic plastic trays. You’ll need a good pH meter and a consistent schedule. It’s cheap, but it’s labor-intensive. You can use standard plastic seedling trays for the early stages to keep costs down.
The Premium Approach (Automated)
If you want consistency and freedom, automation is the way to go. Systems like the Blumat Automatic Watering System Kit use ceramic sensors to "know" when the soil is dry and deliver water exactly when the plant needs it. No electricity is required; it works on gravity. Pairing this with a Grow1 collapsible water storage tank gives you a professional-grade reservoir system that can keep your garden running for a week or more without your intervention.

The Verdict: Automation is a "quality of life" upgrade. It won't necessarily grow better plants than a master gardener hand-watering, but it will make your life much easier and reduce the margin for human error.
Where to Splurge vs. Where to Save
It’s easy to say "just buy the best of everything," but for most of us, that isn't realistic. Here is a quick breakdown of how to prioritize your spending.
| Component | Priority | Recommendation |
|---|---|---|
| Grow Light | High | Buy the best LED you can afford. It’s the engine of your garden. |
| Carbon Filter | High | If smell is an issue, don't buy the "off-brand." |
| Grow Tent | Medium | A cheap tent works, but a premium tent lasts forever. |
| Inline Fan | Medium | Smart controllers are great, but a basic fan works in a pinch. |
| Nutrients | Medium | Focus on a clean, simple line. More expensive isn't always better. |
| Pots/Trays | Low | Plastic pots and fabric bags are cheap and effective. |
Common Pitfalls to Avoid
It seems like every new grower makes the same two mistakes: buying a light that’s too small for their space and forgetting about the environment.
Caution: A common misconception is that a "1000W" LED from a random marketplace site is the same as a professional fixture. This is not the case. Always look for the actual power draw (watts from the wall) and the PPF/PAR maps. If a manufacturer doesn't provide those, move on.
Another frustration is humidity. Many growers spend thousands on lights and tents but forget to buy a dehumidifier. In the final weeks of flowering, high humidity is your biggest enemy. No amount of "premium" gear will save a crop from bud rot if your environment isn't controlled.
Getting Started
If you’re feeling overwhelmed by the choices, don't worry. You don't have to figure it all out today. Sometimes the best way to learn is to start small and upgrade as you grow.

Whether you want to start with a small 24"x24"x48" tent for a single plant or you’re ready to build out a full-scale room, the goal is the same: healthy plants and a successful harvest.
If you need a hand deciding which pieces of gear are right for your specific space, we offer grow tent consulting to help you get it right the first time. There’s no reason to waste money on equipment that doesn't fit your goals.
Indoor gardening is a journey of constant learning. Whether you choose the budget route or the premium path, the most important thing is to get those seeds in the dirt (or the rockwool cubes) and start growing!