Blog
Foliar Feeding: When and How to Apply Nutrients Directly to Leaves
Hey there, Mark here from Perfect Gardens. If you’ve been growing for a while, you know that the roots are the primary engine of your plant. You spend a lot of time dialing in your soil, checking your runoff, and making sure your hydroponic reservoirs are perfectly balanced. But what if I told you there’s a shortcut?
Foliar feeding is one of those techniques that can feel like a "cheat code" when done right. Instead of waiting for the roots to process nutrients and pump them up through the vascular system, you’re delivering the goods directly to the leaves. It’s the difference between mailing a letter and sending an instant message.
In this guide, we’re going to break down the "why," the "when," and the "how" of foliar feeding so you can use it to fix deficiencies, boost growth during transition, and keep your garden thriving without accidentally burning your crop.
What Exactly is Foliar Feeding?
The fact of the matter is, plants aren't just one-way streets. While they mostly drink through their roots, their leaves are covered in tiny pores called stomata. These stomata are primarily there for "breathing", taking in carbon dioxide and releasing oxygen and water vapor, but they can also absorb liquid nutrients.
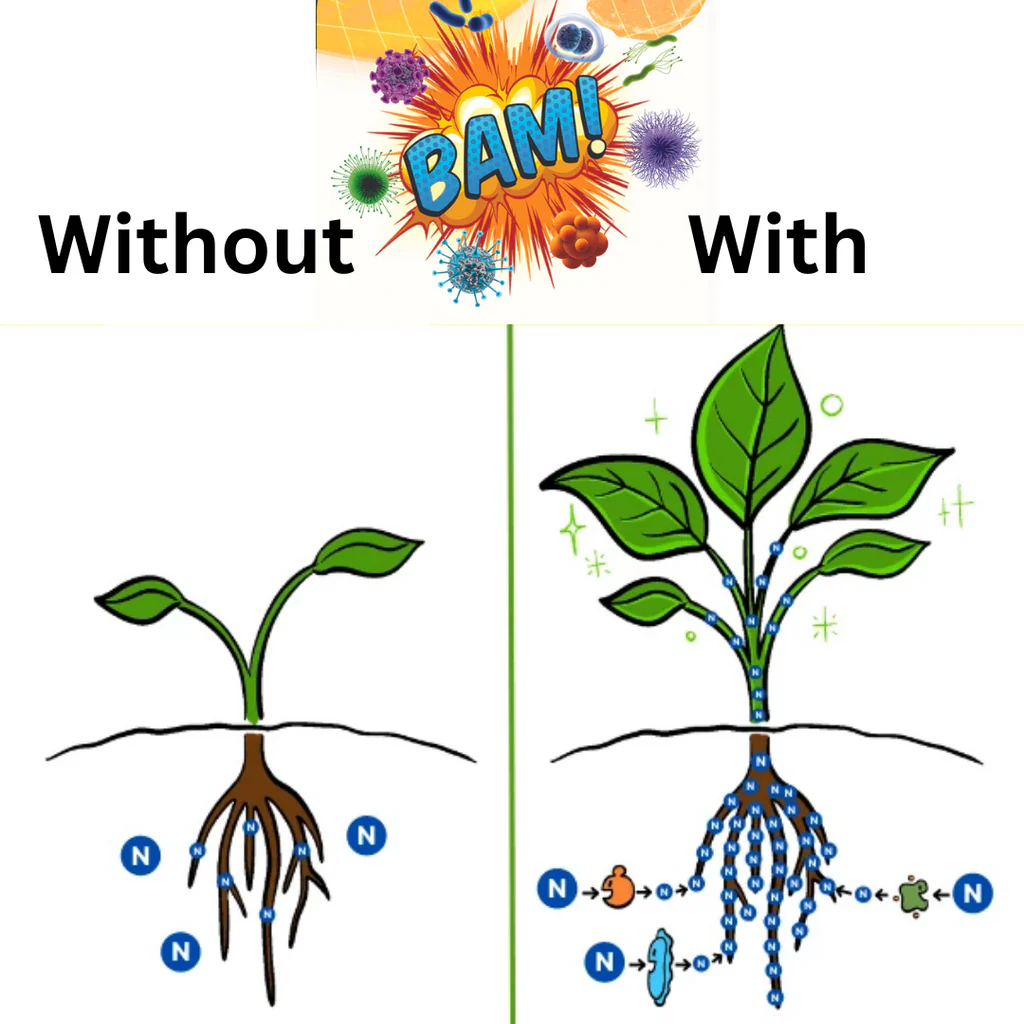
Foliar feeding is the process of spraying a nutrient-rich solution directly onto the foliage. This bypasses the soil entirely. Why does that matter? Well, sometimes your soil pH might be a bit off, or the ground might be too cold, causing "nutrient lockout." When the roots are struggling to grab what they need, foliar feeding allows you to feed the plant directly through its "skin" until you can get the root zone back in order.

The Big Benefits: Why Bother Spraying?
You might think, "My plants look fine, why the extra work?" Foliar feeding isn't necessarily a replacement for a solid root-feeding regimen, but it is an incredible supplement. Here’s why we use it:
- Lightning-Fast Uptake: Plants can absorb nutrients through their leaves up to 8 to 10 times faster than through their roots. If you see a nitrogen deficiency (yellowing leaves) or a calcium issue, a foliar spray can start fixing the problem in hours, not days.
- Bypassing Soil Issues: If your soil is waterlogged, too salty, or has a pH imbalance, the roots simply won't work correctly. Foliar feeding keeps the plant alive and healthy while you troubleshoot the grow-help issues in the medium.
- Boosting Stress Tolerance: Spraying certain minerals or microbes can help a plant deal with extreme heat, cold, or transplant shock.
- Targeted Nutrition: During specific growth phases, like the transition from veg to flower, plants have a massive "hunger spike." A well-timed foliar spray can give them the extra energy they need to produce more bud sites.
Timing is Everything: Lights On or Lights Off?
This is where a lot of growers get tripped up. If you spray at the wrong time, you’re either wasting your money or, worse, hurting your plants.
The stomata are the "doors" to the leaf. If those doors are closed, the nutrients just sit on the surface, dry up, and can actually cause salt burns. Generally, stomata open in response to light and humidity. However, they tend to close when it gets too hot to prevent the plant from losing too much water.
The "Early Morning" Rule
In an outdoor setting, the best time to spray is early morning, just as the sun is coming up. The temperature is cool, the stomata are opening, and the plant has all day to process the food.
Indoor Growing: The 15-Minute Window
For indoor growers using LED lights, it’s a bit different. You have two main options:
- Lights On: Spray right as the lights come on or about 15 minutes before. This gives the plant time to absorb the moisture before the heat of the lights ramps up.
- Lights Off: Some growers prefer spraying just as the lights go out. While this prevents "leaf burn" from light magnification, you have to be very careful about humidity. High moisture and darkness are an open invitation for powdery mildew and mold.
Caution: Never spray in the middle of your light cycle when the intensity is at its peak. The water droplets act like tiny magnifying glasses, and you can end up with permanent burn spots on your beautiful fan leaves.
How to Apply Foliar Nutrients Like a Pro
It seems like you just "spray and pray," but there is a bit of a technique to it. If you want the best results, follow these steps:
1. Start with Clean Water
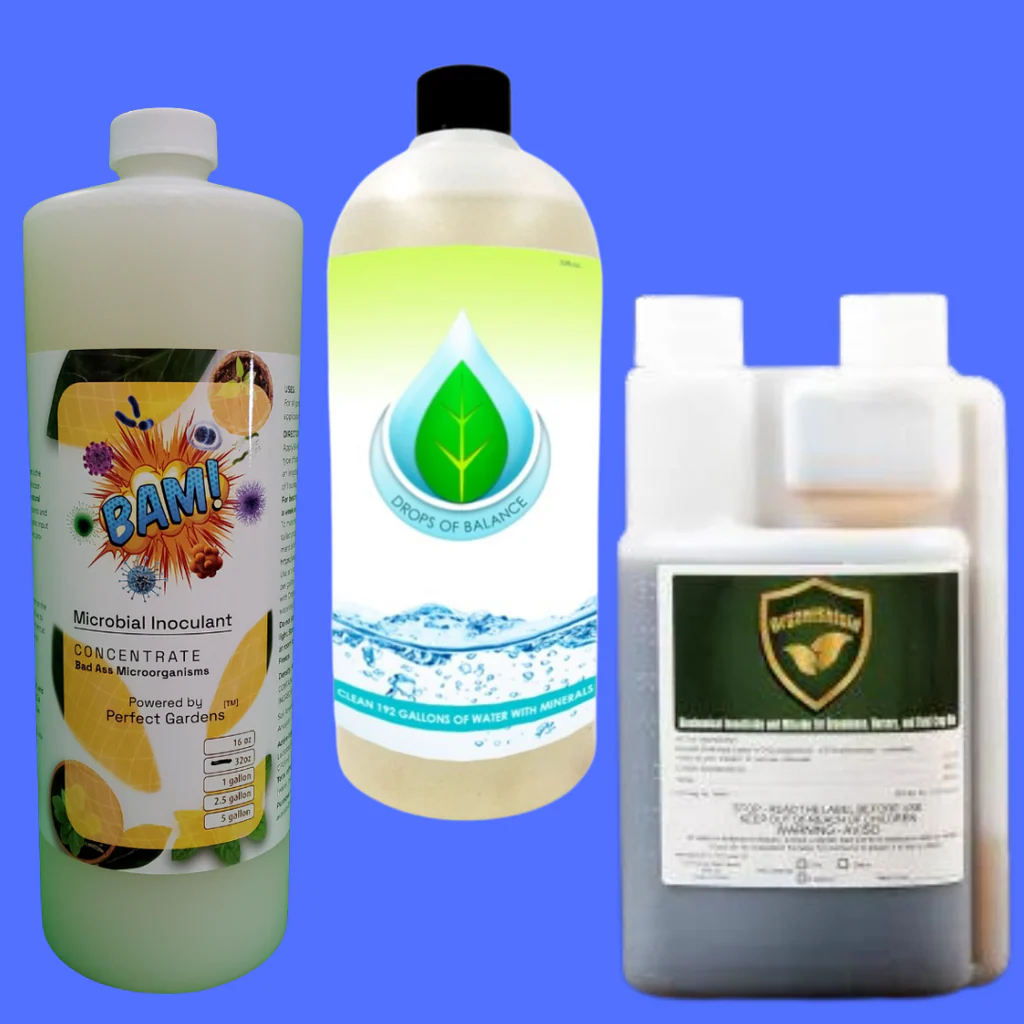
The water you use matters. If your tap water is full of chlorine or heavy minerals, it can mess with the nutrients you're trying to add. We always recommend using something like Drops of Balance to purify and mineralize your water first. This ensures the solution is "clean" and ready for the plant to take in.
2. Use a Surfactant (The "Wetting Agent")
Have you ever noticed how water beads up on a leaf and rolls off? That’s because leaves have a waxy cuticle designed to repel water. If the water rolls off, the nutrients don't get in. A surfactant or "wetting agent" breaks the surface tension of the water, allowing it to spread out in a thin film over the leaf. You can use specialized products or even a tiny drop of organic, unscented soap.
3. Focus on the Underside
This is the "pro tip" most beginners miss. The majority of a plant's stomata are located on the underside of the leaves. If you’re only spraying the tops, you’re only getting a fraction of the absorption. Use a 360-degree sprayer and get up under that canopy.
4. Watch Your Concentration
Foliar sprays should usually be weaker than your root drench. A good rule of thumb is to start at 25% to 50% of the recommended strength on the nutrients bottle. You can always add more later, but you can’t "un-spray" a burnt leaf.
What Should You Be Spraying?
Not every nutrient is meant for the leaves. Here’s what works best:
- Micro-nutrients: Things like Iron, Magnesium (Epsom salts), and Calcium are absorbed beautifully through foliage.
- Microbial Inoculants: Spraying beneficial bacteria like BAM! Microbial Inoculant can help create a "bio-shield" on the leaf surface, protecting it from pathogens.
- Organic Pest Control: If you’re dealing with mites or aphids, foliar application of OrganiShield is the most effective way to handle the problem.

When to Avoid Foliar Feeding
It’s not all sunshine and rainbows. There are times when you definitely should put the sprayer down.
- Heavy Bloom: Once your plants are in the thick of the flowering stage and the buds are getting dense, stop spraying. Moisture trapped inside a dense bud is the #1 cause of bud rot (Botrytis). If you absolutely must spray for a deficiency during late bloom, be extremely careful and ensure you have high airflow to dry the plants out quickly.
- High Heat: If your grow room is over 85°F, the stomata are likely closed to preserve moisture. Spraying now is just a waste of time.
- Young Seedlings: While you can foliar feed clones and seedlings, their tissues are very tender. Use an extremely diluted mix.
Common Pitfalls to Watch Out For
I've seen a lot of growers make the same mistakes over the years. Here’s how to avoid them:
- pH Issues: Even though it’s a spray, pH still matters. If your spray solution is at a pH of 8.0, the nutrients might stay "locked" in the liquid and never enter the leaf. Aim for a slightly acidic range, around 5.8 to 6.2 for most crops.
- Over-spraying: You don't need to drench the plant until it’s dripping onto the floor. A fine mist that covers the surface is plenty.
- Ignoring the Roots: Remember, foliar feeding is a supplement. If you stop feeding the roots, the plant will eventually suffer. Use it as a boost, not a crutch.
Putting It All Together
Foliar feeding is a powerful tool in your gardening arsenal. Whether you're trying to fix a yellowing leaf in record time or you want to give your plants an organic microbial boost with a Vortex Brewer tea, the key is consistency and timing.
The fact of the matter is, every garden is different. Start slow, test a single leaf if you're worried about burn, and watch how your plants respond. Usually, within 24 hours, you’ll see a perkier, greener plant looking back at you.
If you're looking for the right setup to get started, check out our complete hydroponic systems or grab a bottle of Drops of Balance to make sure your foliar mix is as clean as possible.
Keep growing, stay observant, and don't be afraid to give your leaves a little love!