Blog
Maximizing Yield with Compost Tea Brewer Techniques
Interactive Breakdown: What to Look For in the Image Above
- The Vortex Effect: Notice the central cone of water movement; this isn't just for show, it’s how you pull oxygen into the deepest layers of the brew.
- Bubble Density: High-quality brewers produce a consistent "rolling boil" of air, ensuring no anaerobic pockets can form.
- Color Profile: A successful brew should look like a rich, dark stout. If it’s translucent, your microbial density is likely too low.
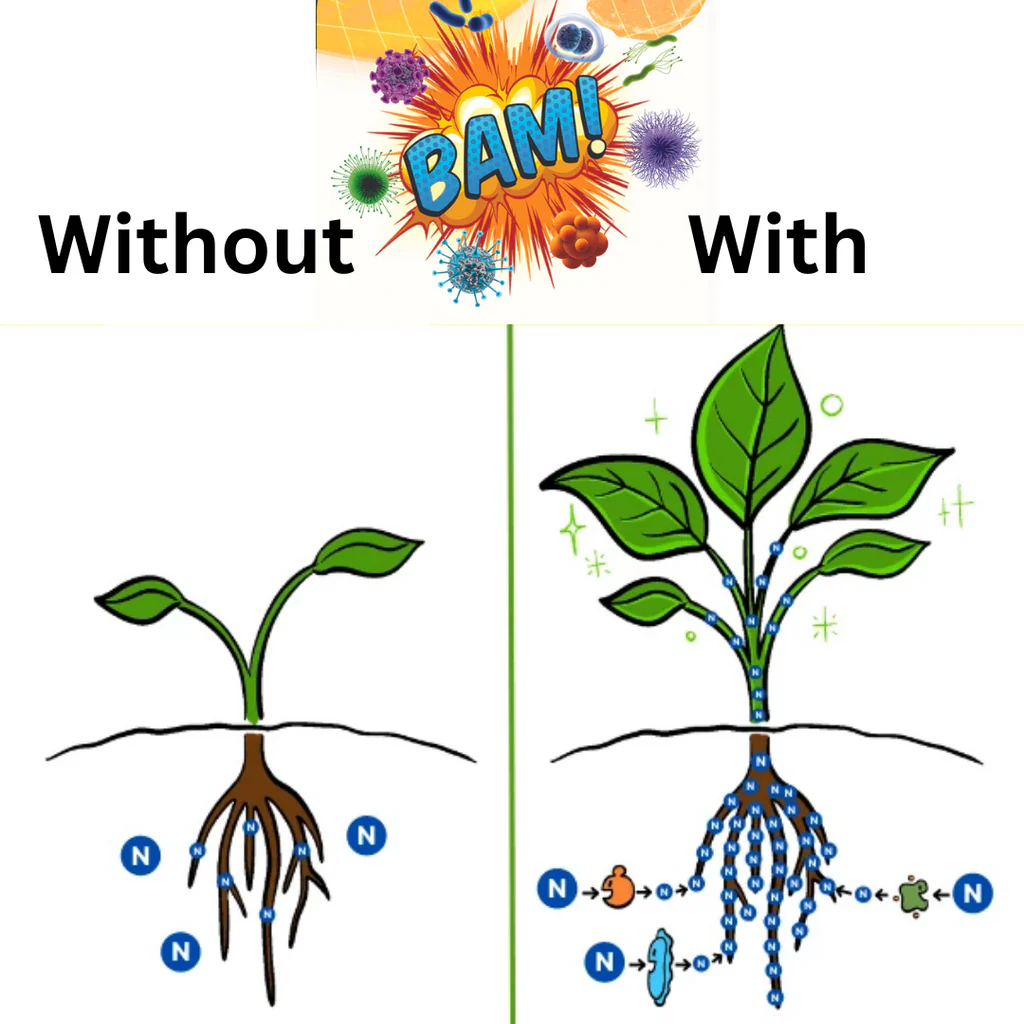
As we move deeper into the indoor growing season, the focus shifts from just "keeping plants alive" to "pushing them to their genetic limit." If you’ve been relying solely on bottled salt nutrients, you’re only seeing half of what your garden can do. The real magic happens in the rhizosphere, the area around the roots, and there is no better way to supercharge that zone than with high-quality compost tea.
Brewing compost tea is part science, part art. While the concept is simple, extracting and multiplying beneficial microbes from compost into a liquid solution, the execution determines whether you get a yield-boosting elixir or a bucket of stagnant swamp water.
The Foundation: High-Quality Inputs and Water Prep
The fact of the matter is that your tea is only as good as what you put into it. You cannot brew high-biology tea from low-quality, "sterile" bagged soil from a big-box store. You need inputs that are teeming with life.
1. The Compost Source
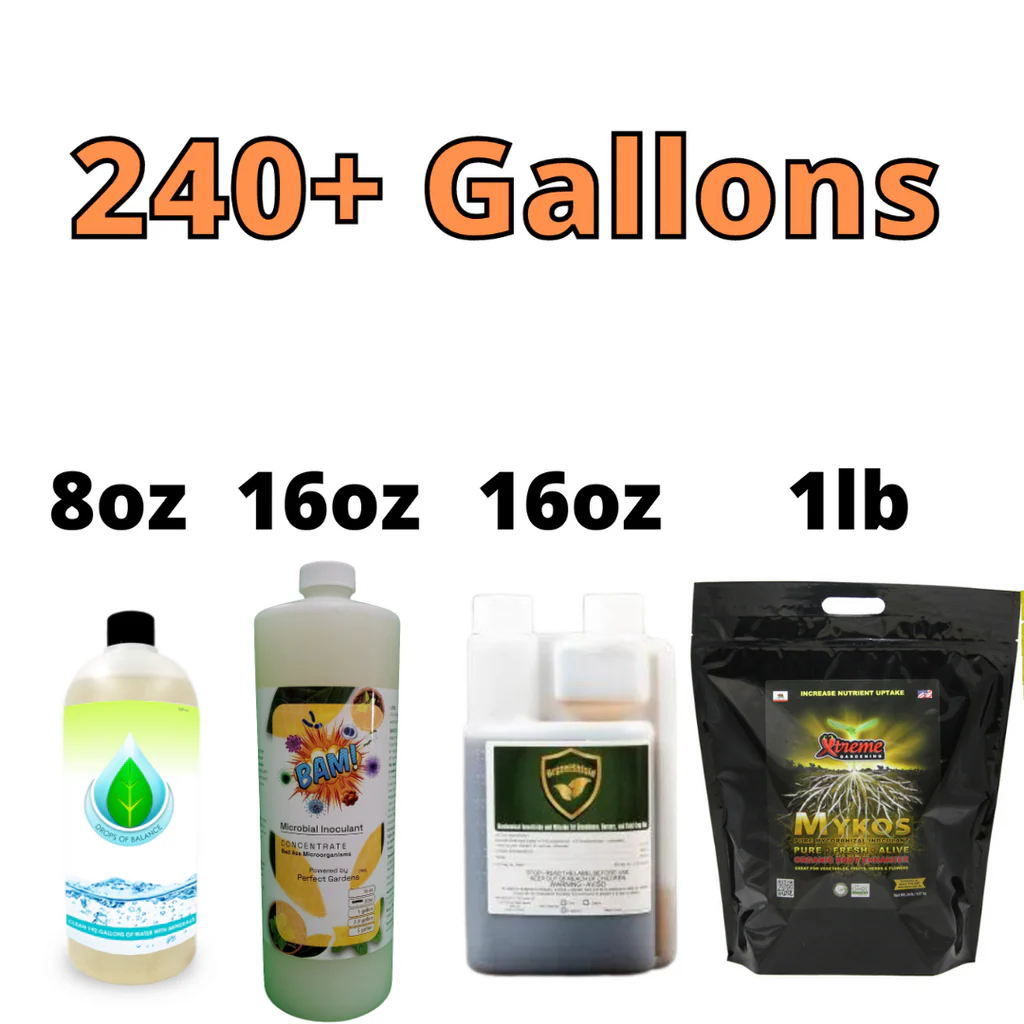
Your primary source should be high-quality finished compost or, better yet, vermicompost (worm castings). Worm castings are the "gold standard" because the digestive tract of the worm naturally concentrates beneficial bacteria and fungi. We often recommend using products like Xtreme Gardening Mykos alongside your compost to ensure a diverse fungal profile right out of the gate.
2. Water Quality
This is where many beginners fail before they even start. If you are using municipal tap water, it contains chlorine or chloramines designed to kill microbes. If you put those into your brewer, they will do exactly what they were designed to do: kill the very bacteria you’re trying to grow.
You must off-gas your water for at least 24 hours with an air stone, or use a filtration system. Drops of Balance is an excellent tool here to help purify and optimize your water source, ensuring a clean slate for your microbial colony.
Temperature and Aeration: The Science of Success
Microbes are like people; they have a "Goldilocks zone" where they are most productive. If your water is too cold, they go dormant. If it’s too hot, the water cannot hold enough dissolved oxygen, and the "bad" anaerobic bacteria take over.
The 70-80°F Sweet Spot
Research and experience show that brewing at 70-80°F (21-27°C) is optimal. At 72°F, a standard brewing time is 24 hours. If your grow room is running hot (say, 85°F), you need to shorten your brew time to 12-18 hours because the microbes will multiply faster and consume the available oxygen more quickly.
Dissolved Oxygen (DO) Levels
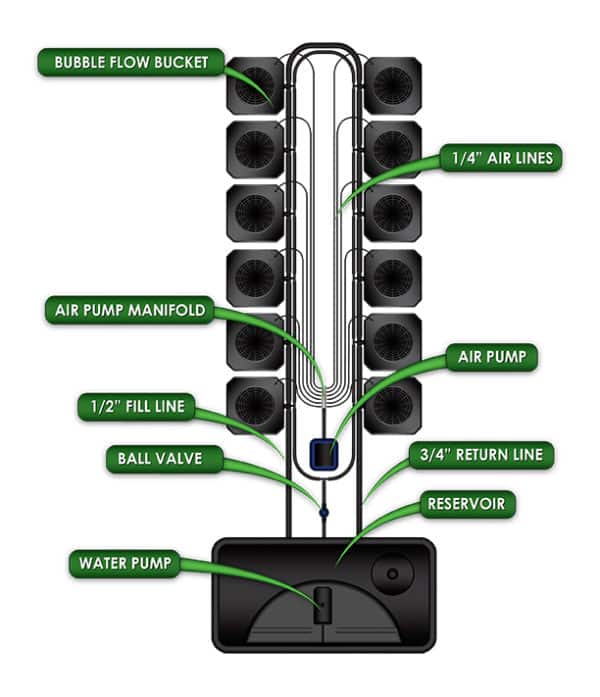
Aeration is the single most important technical factor. You need to maintain dissolved oxygen levels above 6 ppm. This is why the shape of your brewer matters. Cylindrical or conical-shaped tanks, like those found in Vortex Brewers, are superior because they eliminate "dead zones" where sediment can settle and turn anaerobic.
 Caption: A high-flow Vortex Brewer setup showing the constant circulation required for maximum microbial multiplication.
The "Secret Sauce" Recipes for Maximum Yield
While you can go deep down the rabbit hole of additives, we like to keep it focused on what actually drives yield. Here is a baseline recipe for a 5-gallon batch that we’ve seen work wonders:
- 2 Cups High-Quality Worm Castings: The microbial starter.
- 2 Tablespoons Unsulfured Blackstrap Molasses: The primary food source for bacteria.
- 1 Tablespoon Liquid Kelp: Provides trace minerals and growth hormones like cytokinins.
- Optional: BAM! Microbial Inoculant: Adding a concentrated inoculant mid-brew can exponentially increase the final colony count.
Caution: Don't Overfeed
It seems more like "more is better" when it comes to molasses, but this is not the case. Overloading your tea with sugar can cause a massive bacterial bloom that sucks all the oxygen out of the water in a matter of hours, leading to a foul-smelling, useless mess. Stick to the ratios.
Advanced Brewing Techniques
If you are looking to scale your operation or simply want the highest efficiency, you need to look at how you handle the "tea" once it's brewed.
- The Biofilm Factor: After a few brews, you’ll notice a slimy layer on the inside of your buckets and hoses. This is biofilm. While it contains microbes, it can also harbor pathogens. Always clean your equipment with a mild hydrogen peroxide solution between brews.
- The Smell Test: Your finished tea should smell like rich, damp forest floor or "sweet" earth. If it smells like rotten eggs, ammonia, or vinegar, throw it out. Do not put it on your plants. An anaerobic brew can introduce pathogens like E. coli or Salmonella to your root zone.
Application for Exponential Yield
Once the brew is finished, the clock starts ticking. Microbes start dying off the moment the aeration stops. You should aim to apply your tea within 2-4 hours of turning off the pump.
Root Drench vs. Foliar Spray
- Root Drench: This is the most common method. By pouring the tea directly into the soil or hydroponic reservoir, you are inoculating the root zone. This improves nutrient uptake and helps the plant resist soil-borne diseases.
- Foliar Spray: This is a "pro-tip" for yield. Spraying a strained version of the tea onto the leaves coats the plant in beneficial microbes that compete with pathogens like powdery mildew. It also allows the plant to absorb nutrients directly through the stomata.
Integrating with Hydroponics
If you are running a Complete Hydroponic System, you need to be careful with "chunky" teas. Always strain your tea through a 400-micron mesh bag before adding it to a reservoir to prevent clogging your pumps and lines.
The ROI of Compost Tea
Why go through the trouble? The fact of the matter is that microbial diversity leads to more resilient plants. In the late stages of bloom, when plants are under the most stress, a healthy microbial colony acts as a buffer. It breaks down complex organic matter into plant-available nutrients, ensuring your plants never hit a "nutrient wall."
We’ve seen growers increase their harvest weight by 15-20% simply by switching from a sterile salt program to a hybrid program that incorporates weekly compost tea applications.
Summary Checklist for Your Next Brew
- Scrub your equipment: Use H2O2 to ensure a clean start.
- Prep the water: Use Grow1 tanks for large batches and ensure 24 hours of aeration to remove chlorine.
- Check the temp: Keep it between 70-80°F.
- High-quality inputs: Use fresh worm castings and a microbial booster like BAM!.
- Watch the clock: 24 hours is the sweet spot for most setups.
- Apply immediately: Don't let the liquid sit without air.

Whether you are a hobbyist in a small tent or managing a large-scale facility, mastering the art of the brew is one of the most cost-effective ways to improve the quality, flavor, and yield of your harvest. If you have questions about which brewer is right for your specific square footage, check out our Vortex Brewer collection or reach out to our team for a personalized recommendation. Keep it aerobic, keep it clean, and watch your plants thrive!