Blog
The Ultimate Indoor Gardening Setup: A Step-by-Step Checklist
So, you’ve decided to move the garden indoors. Whether you’re tired of battling the local deer population, dealing with unpredictable weather, or you just want to grow fresh herbs and veggies year-round, setting up an indoor grow space is one of the most rewarding projects you can take on.
The fact of the matter is that indoor gardening gives you something nature can’t: total control. You are the "sun," the "rain," and the "wind." But with great power comes a fair amount of equipment and planning. If you miss a step, the environment can quickly turn against you.
This guide is designed to walk you through the essential checklist for building a high-performing indoor garden from scratch. We’ll cover everything from floor space to feeding schedules, so you can avoid the common pitfalls that trip up most beginners.
Step 1: Mapping Your Space and Layout
Before you buy a single light or bag of soil, you need to know where this garden is going to live. A common mistake is picking a spot based on convenience rather than environmental suitability.
- Measure Your Footprint: Don’t just guess. Measure the length, width, and: most importantly: the height. Plants need room to grow, and your lights need to stay a safe distance from the canopy to avoid light burn.
- Access to Power: A full setup requires several outlets for lights, fans, pumps, and timers. Ensure your circuit can handle the load. Avoid using cheap power strips; look for heavy-duty surge protectors.
- Water Source: Lugging five-gallon buckets across a carpeted living room gets old very fast. Ideally, your grow space should be near a sink or a water line.
Caution: Don't forget about floor protection. Whether you are using soil or hydroponics, water will eventually end up on the floor. If you aren't using a dedicated grow tent with a waterproof floor tray, consider laying down black and white panda film to protect your home and reflect light back up to the plants.
Step 2: Choosing Your "Housing" – Tents vs. Open Rooms
While you can grow plants on a windowsill or an open shelf, serious indoor gardening usually requires a dedicated enclosure.

A grow tent, like the ones found in our tents and film collection, is the industry standard for a reason. It allows you to create a "micro-climate." Inside a tent, you can control the humidity and temperature far more easily than in a large, open room.
Why use a tent?
- Light Containment: The reflective interior (usually Mylar) ensures your plants get light from all angles, not just the top.
- Pest Control: It’s much harder for spider mites or fungus gnats to find your plants when they are zipped inside a canvas barrier.
- Smell Management: Tents make it easy to install carbon filters to "scrub" the air before it leaves the room.
Step 3: Picking Your Growing Method
Are you a "dirt" person, or are you ready for the "water" life? Your choice here determines the rest of your equipment list.
The Soil Route
Soil is forgiving. It acts as a buffer for pH and nutrients. If you make a small mistake, the soil usually helps smooth it over. It’s the best entry point for hobbyists who want a more traditional gardening experience.
The Hydroponic Route
Hydroponics is for those who want maximum growth speed and yield. By delivering nutrients directly to the roots in a water-based solution, plants can grow up to 30-50% faster than in soil.
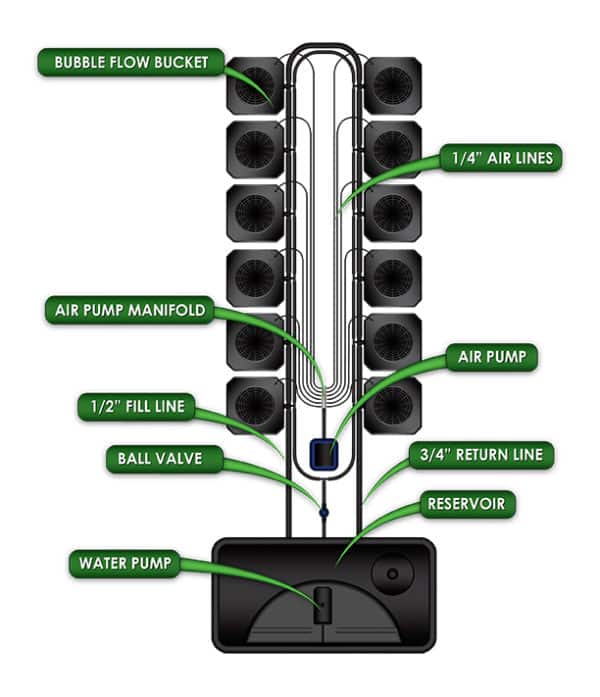
If you go the hydro route, you’ll need a system like a Hydroponic Bubble Flow Bucket. These systems automate the "rain" and feeding for you, but they require you to be much more precise with your water chemistry.
Step 4: The "Sun" – Selecting Your Grow Lights
This is where most people get overwhelmed. Lighting is the engine of your garden. If you skimp here, your plants will be "leggy": tall, thin, and weak because they are stretching to find light.
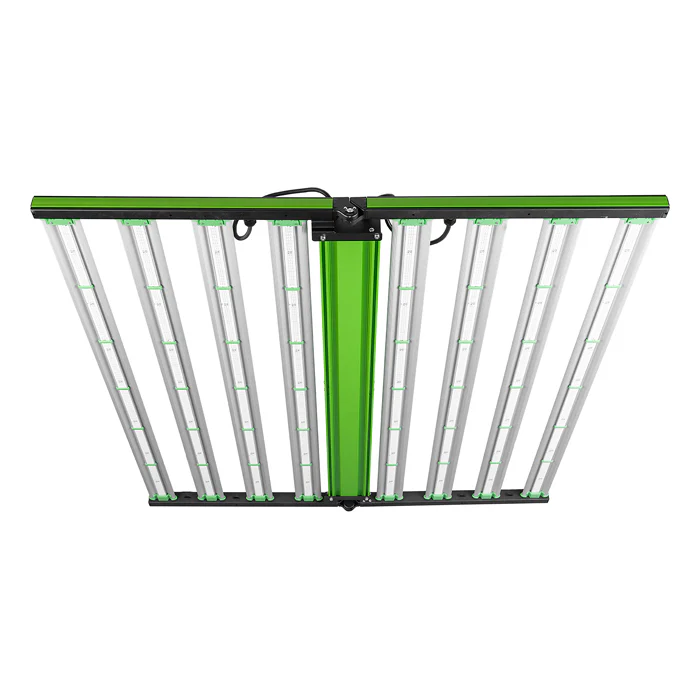
LEDs (Light Emitting Diodes) have almost entirely replaced older HID and HPS lights in modern setups. They are cooler, use less electricity, and have a spectrum that can be tailored for both growth and flowering. When browsing our LED lights collection, look for "Full Spectrum" fixtures. These provide the blue light needed for leafy growth and the red light needed for blooming.
Pro Tip: Use a digital timer. Plants need a consistent "circadian rhythm." Most indoor gardeners use an 18/6 cycle (18 hours on, 6 hours off) for the vegetative stage and a 12/12 cycle for flowering.
Step 5: Ventilation and Environment Control
Plants "breathe" CO2. In a closed tent, they will quickly use up all the available CO2, stalling their growth. You need a system to move old air out and bring fresh air in.
The Basic Ventilation Checklist:
- Inline Exhaust Fan: This pulls hot, stale air out of the top of your tent.
- Carbon Filter: If you are growing aromatic plants, this is a must. It attaches to your exhaust fan to neutralize odors.
- Circulation Fans: Small clip-on fans inside the tent are vital. They prevent "dead air" spots where mold and mildew like to hide. A gentle breeze also strengthens the plant stems.
- Hygrometer: A cheap but essential tool that measures temperature and humidity. Aim for 70-80°F and 50-60% humidity for most indoor crops.
Step 6: Nutrients and Microbial Life
In an indoor setup, your plants are entirely dependent on what you give them. Unlike an outdoor garden, there are no worms or natural decomposition to provide food.
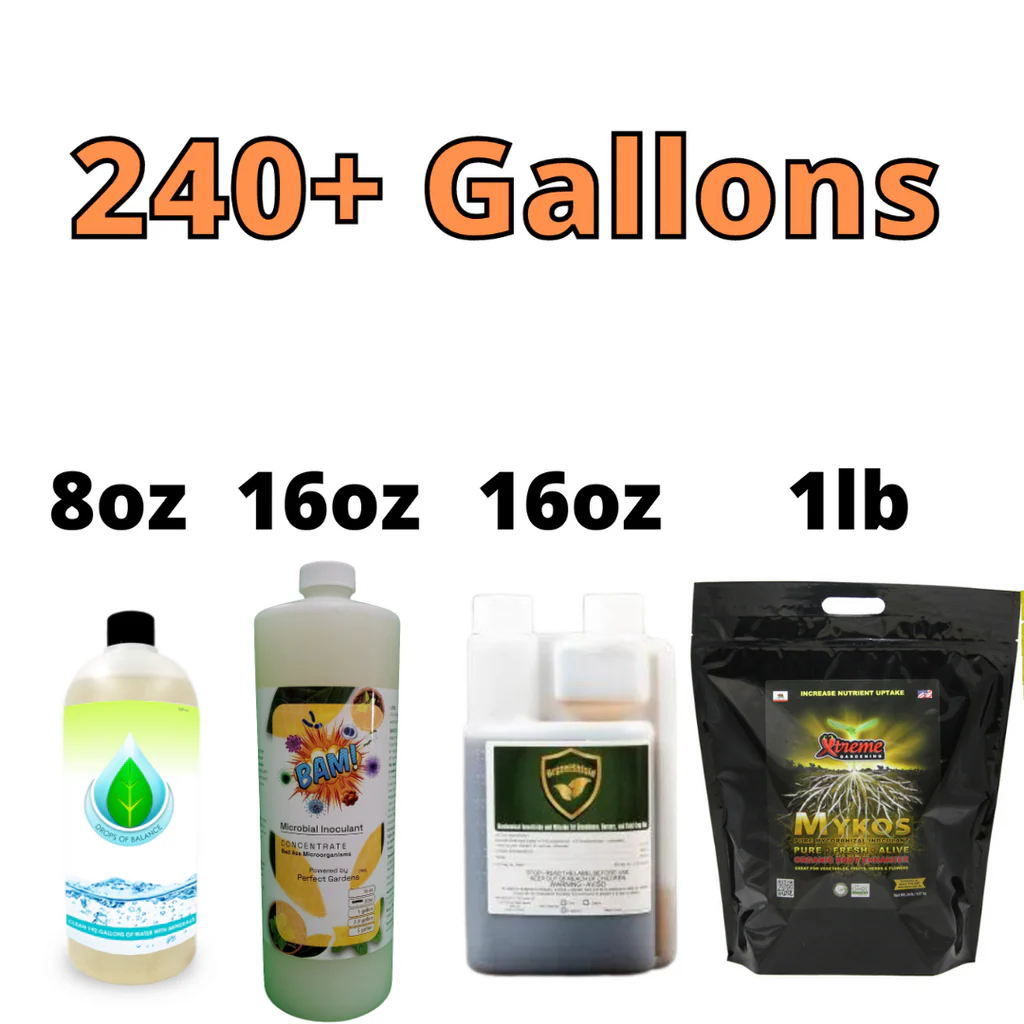
You need a high-quality nutrient line. However, the secret to a professional-grade indoor garden isn't just the N-P-K (Nitrogen, Phosphorus, Potassium) on the bottle. It’s the microbial life you add to the root zone.
We often recommend a "Microbial Inoculant Kit" that includes things like mycorrhizae and beneficial bacteria. These microscopic helpers attach to the roots and help the plant "eat" more efficiently. Products like Drops of Balance can also help ensure your water is clean and mineral-rich, which is the foundation of any feeding program. You can find these in our plant nutrients packages.
The Indoor Setup Checklist Summary
To make things easy, here is your "Pre-Flight" checklist before you start germinating seeds:
- Space: Area is measured, cleaned, and has adequate power.
- Enclosure: Grow tent is assembled and light-leaks are checked.
- Lighting: LED light is hung securely and plugged into a timer.
- Ventilation: Exhaust fan is pulling air through a carbon filter; clip-on fans are positioned for airflow.
- Media/System: Soil is prepped in fabric pots, or the hydroponic system is leak-tested.
- Water/Nutrients: You have a pH test kit, base nutrients, and microbial inoculants ready.
- Environment: Hygrometer shows temperature and humidity are within the "green zone."
Common Pitfalls to Avoid
It’s easy to get excited and over-engineer your first grow, but keep these "Caution" points in mind:
- Overwatering: This is the #1 killer of indoor plants. In a tent, water doesn't evaporate as fast as it does outside. Always check the soil moisture with your finger before adding more.
- Ignoring pH: If your water is too acidic or too alkaline, your plants will experience "nutrient lockout." They could be sitting in a goldmine of nutrients but won't be able to absorb them. Aim for a pH of 6.0–6.8 for soil and 5.5–6.2 for hydro.
- Heat Stress: Don't put your lights too close. If the back of your hand feels hot when held at the top of the plants, the light is too close.
Closing Thoughts
Setting up an indoor garden might seem like a lot of moving parts, but once you have the foundation built, the daily maintenance is actually quite peaceful. It’s about checking your water, observing your leaves, and enjoying the process of watching life thrive in a room you built.
If you’re feeling stuck on which light or nutrient package fits your specific space, check out our grow help section or dive into our other blog posts for more deep dives into specific growing techniques.
Your journey from seed to harvest starts with a solid setup. Get the environment right, and the plants will do the rest of the work for you. Happy growing!