Blog
Setting Up Automation: Timers, Sensors, and Peace of Mind
Gardening is often described as a labor of love, but if we are being honest, the "labor" part can eventually become a burden. Whether you are growing for hobby or for yield, the daily checklist of checking temperatures, manual watering, and flipping light switches can tie you to your grow room in a way that feels more like a job than a passion.
The fact of the matter is that human error is the number one cause of crop failure. We forget to check the reservoir, we sleep through a light cycle change, or we miscalculate the humidity during a rainy week. Automation isn't about being "lazy": it’s about removing the variable of human inconsistency. By integrating timers, sensors, and controllers, you create a system that reacts faster than you ever could.
In this guide, we’ll break down how to transition from a manual setup to an automated sanctuary, giving your plants a stable environment and giving you back your peace of mind.
The Foundation: Lighting Timers
The most basic, yet most critical, piece of automation is the light timer. Plants rely on photoperiodism: the physiological reaction of organisms to the length of night or a dark period. If your "dark" period is interrupted by a light turning on late, or if you forget to turn the lights off, you risk stressing the plant. This stress often leads to hermaphroditism or "revegging," both of which can ruin a harvest.
Analog vs. Digital Timers
There is a common misconception that digital is always better. While digital timers allow for precise "to the second" scheduling and often have battery backups, they can be prone to failure if they are hit with a power surge or electromagnetic interference (EMI) from older ballasts.
Analog (mechanical) timers are incredibly robust. They use a series of pins to set the schedule. If the power goes out, the timer simply stops and resumes where it left off once power returns. However, you will need to reset the time of day on an analog timer after a blackout to keep your schedule aligned with the real world.
If you are just starting out, check out our guide on 7 mistakes you're making with grow lights to ensure your foundation is solid before you start automating.
Climate Control: Managing the "VPD Sweet Spot"
Temperature and humidity are not static. They change based on the stage of the plant's life, the heat generated by your lights, and the weather outside your house. Manual growers often find themselves constantly adjusting intake and exhaust fans to keep things stable.
Modern environmental controllers have changed the game. Instead of a fan that is either "on" or "off," these controllers use sensors to monitor Vapor Pressure Deficit (VPD). VPD is the relationship between temperature and humidity that determines how easily a plant can transpire.

With a smart controller like those from AC Infinity, you can set "triggers." For example, you can program your exhaust fan to increase its speed by 20% only when the temperature exceeds 82°F or the humidity climbs above 60%. This prevents the "see-saw" effect of the environment swinging wildly between extremes. Using an app to monitor these levels remotely means you can be at work or on vacation and know exactly what is happening in your tent.
Automated Irrigation: Consistency in the Root Zone
Watering is perhaps the most time-consuming task in any garden. It’s also where most beginners fail by overwatering or letting the media dry out too much, which spikes the Salt Index (EC) and burns the roots.
The Gravity-Fed Approach (Blumat)
For soil and coco growers, the Blumat system is a "set it and forget it" favorite. It doesn't use electricity. Instead, it uses a ceramic carrot that senses the moisture level in the soil. When the soil is dry, the carrot opens a valve, allowing water to drip in. When the soil is moist, the pressure closes the valve.

This creates a constant moisture level that encourages a massive root system because the plant never experiences the "drought and flood" cycle of manual watering.
Hydroponic Automation
If you are running a hydroponic setup, automation is even more vital because there is no soil to act as a buffer. A Hydroponic Bubble Flow Bucket System uses pumps and timers to ensure that nutrient-rich, oxygenated water is constantly delivered to the roots.
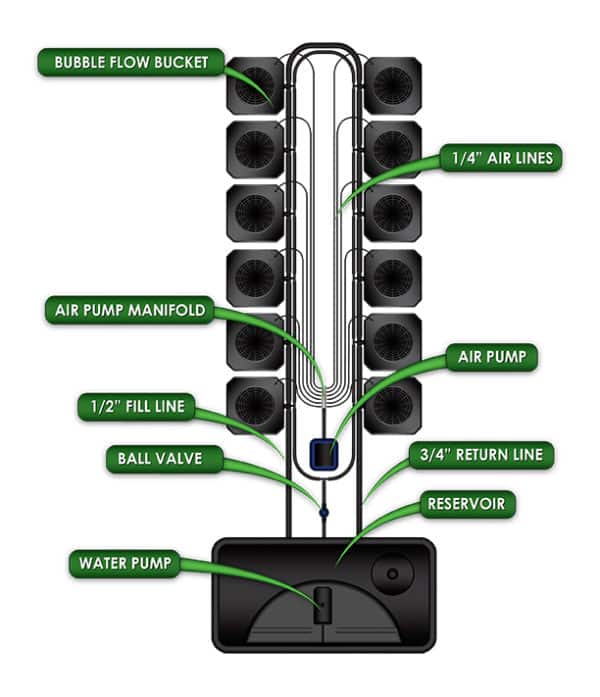
When automating hydro, you should consider a "Top-Off" reservoir. Using a simple float valve (much like the one in your toilet tank), you can ensure that as your plants drink, the reservoir is automatically refilled with fresh water. This prevents the nutrient concentration from becoming too "hot" as the water level drops.
The Role of the Grow Tent in Automation
You can have the best sensors in the world, but if your grow space is "leaky," those sensors will be working overtime. A high-quality grow tent acts as an insulated envelope for your environment.
We often talk about why Gorilla Grow Tents are a great idea because they feature thick fabric (1680D) and tight seals. This insulation makes automation much more efficient. Your heaters don't have to run as long, and your dehumidifiers don't have to fight the humidity of the entire house. It’s much easier to control a 4x4 space than it is to control an entire basement.
Integrating Nutrients and Microbes
Automation isn't just about water and air; it's about delivery. Siphon systems can be used to inject nutrients or microbial inoculants directly into your watering lines. This is particularly useful for larger setups where mixing 50-gallon batches of nutrients by hand becomes a back-breaking chore.
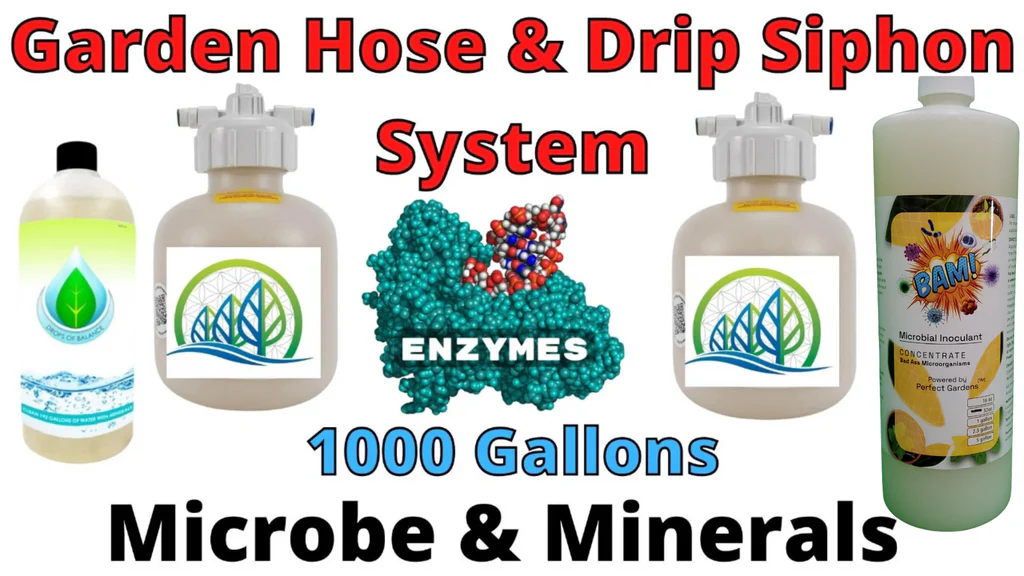
Using a siphon mixer allows you to treat thousands of gallons of water with products like Drops of Balance or BAM Microbial Inoculant with almost zero manual labor. This ensures that every time your automated irrigation kicks in, your plants are receiving the biology they need to thrive. For more on the tech side of this, check out our post on 7 must-have automation tools.
Safety and Redundancy: The "Peace of Mind" Checklist
The biggest fear with automation is a "malfunction." What if a pump gets stuck "on" and floods the room? What if a sensor fails and the heater stays on?
It seems more like common sense, but many growers skip the safety redundancies. Here is how to protect your investment:
- GFCI Outlets: Always plug your equipment into GFCI (Ground Fault Circuit Interrupter) outlets. If water hits an electrical component, the power cuts instantly, preventing fires.
- Water Leak Sensors: Place small, battery-operated Wi-Fi leak sensors on the floor. If a tray overflows, you’ll get a notification on your phone immediately.
- Failsafes: Some controllers have "high-temp shutoffs." If the temperature hits a dangerous level (e.g., 95°F) because an exhaust fan failed, the controller can automatically kill the power to your grow lights.
- Manual Checks: Automation is a tool, not a replacement for the grower. You should still walk into your garden at least once every 48 hours to look for pests, deficiencies, or mechanical wear and tear.

Scaling Your System
As you get comfortable with basic timers, you might want to look into CO2 injection. Automating CO2 involves a regulator, a solenoid valve, and a CO2 monitor. The monitor senses the "parts per million" (PPM) of CO2 in the air and opens the tank only when levels drop. This is a more advanced step, but it follows the same logic: let the sensor do the thinking so you don't have to.
The fact of the matter is that the most successful gardens are the most consistent ones. By taking the "guessing" out of the equation and letting technology handle the repetitive tasks, you're not just growing better plants: you're enjoying the process more.
If you're ready to stop being a slave to your garden and start being its manager, take a look at our full range of controllers and automation tools. Start small with a light timer and a smart fan, and you’ll be surprised at how much more "peace of mind" you have by the time harvest rolls around.